So a little bit of actual progress and a lot of research. Firstly I have got the front deck strong back and one deck batten fitted. Just tonight I have manufactured some more battens.
A lot of my time has been spent on the engine.
I have purchased a second hand velvet drive. If you have read some of the early posts you will see I bought and sold a second hand one previously, but I think I have got it right this time. Anyway waiting for it to arrive.
To go with that I have purchased from Michagan Motorz a mount and oil cooler kit. Again waiting for that to arrive.
I also came across a air flow meter at a good price on Trademe so bought that as well,
Rest of the time has been spent investigating exhaust headers, heat exchangers and engine mounts. The headers and mounts are a bit of a chicken and egg issue. The exhanger, there are plenty of them out there but they are generally replacements for marine engines which is fine, but they don't make it easy to determine which ones would suit my engine. I have got the plumbing sorted in my head, just need to find one suitable for the HP of the engine.
Wednesday 10 December 2014
Monday 24 November 2014
Cockpit deck framing
Progress is a little slow at the moment. Don't have the money at present to get some of the big ticket items i need to make significant progress
However I am still moving forward.
Deck beam 1 has been relocated aft by 100mm as per the instructions.
Deck beam 5 has been cut out and carlings fitted between beams 4 & 6. Finally deck beam 5 has been refitted between the carlings about 300mm forward of its original position.
The next step is to make a copy of beam 4 and fit that between the carlings about 100mm forward of the existing beam 4. The piece of timber i have for this task has a slight twist. I have had it clamped to my bench for about a week but it hadn't helped so yesterday I layed towels over it and soaked them in boiling water and then left it for 12 hours. This has got rid of most of the twist. Going to repeat the process to hopefully get the last of it out.
Photos to follow soon.
Monday 27 October 2014
Cleaning up and sealing the inside
So the first job has been to cut off the hundreds of plastic nails sticking out on the inside. This was reasonably easily achieved with the oscillating saw. Then a quick sand and it was ready for sealing. I have done two coats of the penetrating epoxy. The inside is not perfect by any stretch but a coat of paint and it will be reasonable. Very little of the hull will be visible once the internal fitout is complete.

The big day has arrived - The flip
So last weekend I rounded up about 15 people (mostly fire brigade) and we carried the boat out of the garage to the front lawn, then flipped it over and put it back in the garage on its newly made cradle. In the end it was quick, simple and went very smoothly.
Here's a link to the video
Sunday 19 October 2014
bottom coat done and ready for the flip
Been slack again. I didnt post any pictures if the bottom painting process. In the end I put three coats of two pot paint on. By the last coat I had almost got the hang of the roll and tip method. It doesn't look to bad but I think had I done another coat it would have looked near on perfect.
I have also built a trolley to sit it on after the flip.


Saturday 23 August 2014
It Lives !!!!!!
So today I set out to do some more preperation for starting my engine. Last week I did a temporary fuel system, and before I knew it I was ready to try starting it. Luckily it occured to me to check the oil as it had basically none, so a quick trip to repco fixed that.
I dragged the engine outside and set it up sitting on a pallet, and the engine crane tehering it from above, but not taking any weight, it was just to stop it tipping over.
Then I hooked up the electrics, stole the battery from my car and with no fuel turned it over a couple of times to at least attempt to get some oil circulation.
I then hooked up the fuel, to be honest I didn't expect it to start, I thought if I was luckily it might cough and splutter a bit, but it roared into life no problems at all, with the fuel on, it took only about 3 seconds to start.
It wont idle, but there are plenty of reasons for that, no fly wheel, no MAF sensor to name just two.
It made my day, I can now confidently carry on buying parts to marinise it. It also proved that the decision to send the ECU to Russia to have the security bypassed was a very good move.
http://youtu.be/POdcFvgkR04
Expoxy and painting
So I have finished the 3 coats of epoxy. Like most of these tasks, I got much better towards the end. It endedup fairly bumpy, and when I tried to sand it down I got down to the glass in places. In hind sight I should have put another coat of epoxy on and tried to get it smoother. To be fair I thought I had it fairly smooth, but as painting would later show I was miles off.


Paint, so I settled on a sandable two part epoxy undercoat. This product comes from Altex Paints. I watched thier instructional video on applying it and so recruited my brother to give me a hand. So he took the job of rolling it on, and I was doing the tipping off. What we discovered fairly quickly was it was hard to get a thick even layer. But as we progressed we got better at it, and by the end it was going on well, but the start was terrible.


The paint was a two part epoxy, and by the time we got to the end we had only used half, but had mixed the whole tin. This is despite the fact that a single tim should have only covered about 2/3rd at most of the boat, so it was obviously on way to thin.
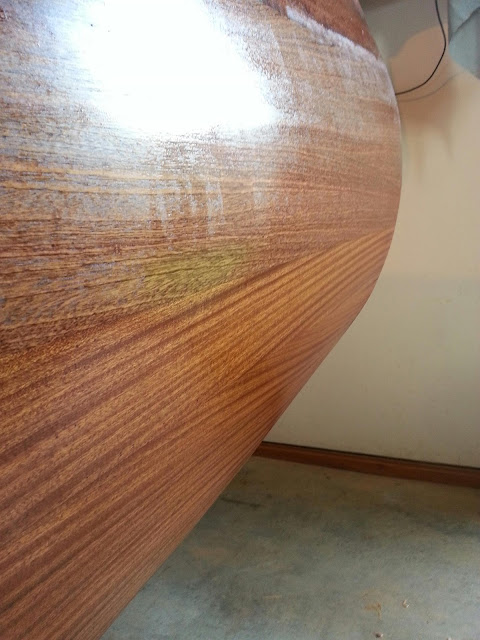
So I did some more thinking and the following weekend applied a second coat, just by roller only, and this time I got the whole tin on. From there it was sanding, and this is where I really discovered the bottom wasn't nearly as smooth as I thought. After sanding in some places i was back down to the epoxy, and so have had to apply a third coat, hopefully this will be the last.


The pink is a guide coat I put on to aid in sanding, its just some old enamel paint mixture with a lot of thinners to make a very runny paint.
I have also purchased some "Pacific Teal" as the final
bottom coat.
Paint, so I settled on a sandable two part epoxy undercoat. This product comes from Altex Paints. I watched thier instructional video on applying it and so recruited my brother to give me a hand. So he took the job of rolling it on, and I was doing the tipping off. What we discovered fairly quickly was it was hard to get a thick even layer. But as we progressed we got better at it, and by the end it was going on well, but the start was terrible.
The paint was a two part epoxy, and by the time we got to the end we had only used half, but had mixed the whole tin. This is despite the fact that a single tim should have only covered about 2/3rd at most of the boat, so it was obviously on way to thin.
So I did some more thinking and the following weekend applied a second coat, just by roller only, and this time I got the whole tin on. From there it was sanding, and this is where I really discovered the bottom wasn't nearly as smooth as I thought. After sanding in some places i was back down to the epoxy, and so have had to apply a third coat, hopefully this will be the last.
The pink is a guide coat I put on to aid in sanding, its just some old enamel paint mixture with a lot of thinners to make a very runny paint.
I have also purchased some "Pacific Teal" as the final
bottom coat.
Sunday 13 July 2014
More epoxy, engine and progress
So after a bit of sanding I decided that the first side I epoxied would be ok.
 I have made a tube for the prop shaft hole. I discovered our vacuum cleaner hose would make a perfect mandrel. A couple of wraps of glad wrap and then I wrapped two full layers of wetted cloth around that. I had figured it would take me a couple of attempts to get this right but the first attempt came out pretty well. Had a little struggle to get it off the mandrel but otherwise it came out very well. This has since been epoxied into the hole. This was a three stage effort. First stage was to get it sitting centralised in the hole and aligned correctly. I left the glue to go off. Then as the second stage I completely sealed around the tube on the inside of the boat. Finally as stage 3 I injected un-thickened epoxy down the gap between the hull and the tube. It came out pretty well. For some reason I didn't take any photos of it or the process.
 I have applied another coat of epoxy to the entire underside. It went reasonably trouble free. Just missed a couple of small patches. This morning when I went to check it and for the first time experienced Amine Blush. I don't think I have really had this before, but this morning it was very obvious. Not so much to see, but I could feel the greasy film, at first I though it was the epoxy hadn't gone off. Before applying the second coat I did scrub the surface down, mostly because I wasn't sure.
I was planning to apply another coat today but it was still a bit soft this morning. It was pretty cold as well today. So I settled for just cleaning the hull down again. It was while doing this I realised I still need to put the edge back on the transom. So that's my task for after work this week.
The engine has progresses a little as well. The fuse holder has turned up, so the wiring has now been completed to about 95%. I have also ordered a cheap and nasty fuel pump from China as a temporary pump for testing.

I have purchased the undercoat for the bottom, and varnish for the sides and transom. That stuffs not cheap, especially when I am going to need about 10 litres of the varnish. Also got a colour chart for the enamel top coat for the bottom, At this stage I am leaning towards the "Pacific Teal" colour.
Plan is still for flipping in September, but its going to be tight
I have made a tube for the prop shaft hole. I discovered our vacuum cleaner hose would make a perfect mandrel. A couple of wraps of glad wrap and then I wrapped two full layers of wetted cloth around that. I had figured it would take me a couple of attempts to get this right but the first attempt came out pretty well. Had a little struggle to get it off the mandrel but otherwise it came out very well. This has since been epoxied into the hole. This was a three stage effort. First stage was to get it sitting centralised in the hole and aligned correctly. I left the glue to go off. Then as the second stage I completely sealed around the tube on the inside of the boat. Finally as stage 3 I injected un-thickened epoxy down the gap between the hull and the tube. It came out pretty well. For some reason I didn't take any photos of it or the process.I was planning to apply another coat today but it was still a bit soft this morning. It was pretty cold as well today. So I settled for just cleaning the hull down again. It was while doing this I realised I still need to put the edge back on the transom. So that's my task for after work this week.
The engine has progresses a little as well. The fuse holder has turned up, so the wiring has now been completed to about 95%. I have also ordered a cheap and nasty fuel pump from China as a temporary pump for testing.
I have purchased the undercoat for the bottom, and varnish for the sides and transom. That stuffs not cheap, especially when I am going to need about 10 litres of the varnish. Also got a colour chart for the enamel top coat for the bottom, At this stage I am leaning towards the "Pacific Teal" colour.
Plan is still for flipping in September, but its going to be tight
Sunday 29 June 2014
Major catchup, been slack again at keeping this up to date
So sanding has gone on forever but there has been plenty going on around it.
 |
| Wish I had filled the staple holes before I started sanding. |
The transmission; I have finally sold the transmission I have, and whats more I got exactly what I paid for it minus "TradeMe" fees. TradeMe is like eBay only way more popular here in NZ. The money from this has financed various directions recently.
Stain; so I got some test pots, and then cleaned up a couple of left over bits of veneer. I stained these and left them to dry. I wasn't particularly impressed with results. I then coated them in penetrating epoxy and that made them look a bit better. Finally I coated one piece in fibreglass. This piece had stripes, a strip of one colour, a plain unstained stripe and then the other colour. By the time I had fibreglassed it I had made my mind up. No stain.
Fibreglassing, so as I mentioned above I fibreglassed a scrap of veneer as part of my stains testing. Regretablly this I think made me a little over confident. Fibreglassing this small piece was very easy and came out exaclty like the books / video's etc said it should.
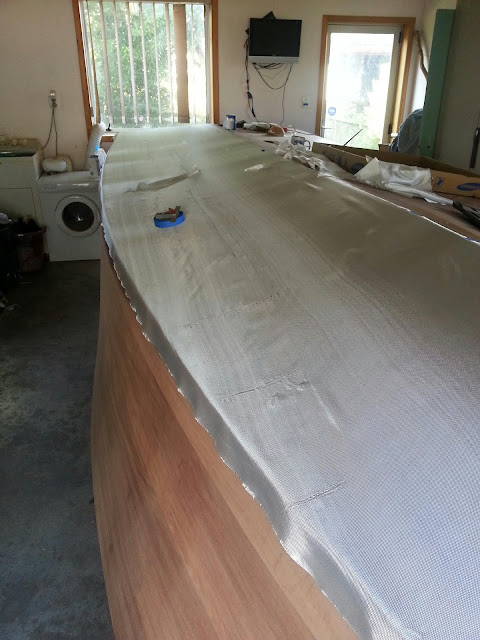 So I prepared one side of the bottom for glassing and got stuck in. It started out well, but to be honest didn't end well. I made several mistakes, one of which was using fast harder instead of slow. The temperature at the time was below the minimum for the slow hardener as per the data sheet, but the fast just went off plain to fast.
Also I used rollers, which seems to push the cloth rather than push the epoxy into the cloth, and lastly I tried to do it all myself. So the end result, the first 3rd looks pretty good, but it get progressivly more ugly as you progress to the stern. I had lumps of epoxy go off underneath the cloth, not big ones but enough to produce definelty lumps in the surface.
So learning from my mistakes, and talking to a couple of guys at work I changed my tactics. I used slow hardener, I used a 6" squeege, and I enlisted my daughter as cheif epoxy mixer. What a huge differnce, the other side of the bottom went very easily, with minimal stress and has come out looking exactly like the books / videos / pictures suggest it should.
So my job for next week is to re-assess the first side and decide whether it is workable or whether it has to come off.
Sanding, well that is finished now, well wood sanding, I have plenty of epoxy resin sanding ahead of me. The job seemed to go on forever, and I made a few goofs in the early stages using the disc sander, but like most things on this boat building journey you learn from your mistakes, and proceed. I am quite certain its not as good as many of the boats on the Glen-L forum, but it aint half bad either.
So far I have now coated one side with penetrating epoxy and to my eyes anyway it looked beautiful.
The plan,
A bit of sanding and then I can apply the 2nd and 3rd coats of epoxy.
A bit of sanding and I can apply penetrating epxoy to the other side and transom.
Under coat the bottom.
A couple of coats minimum of varnish on the sides.
Final coat on the bottom.
Then the flip, which at this stage I am hoping to achieve before the end of september, if not sooner.
In between the above I hope to get the engine started and of course I have to build a cradle for the boat to sit on.

Sanding & finding the waterline
So sanding is progressing, creates a huge mess as the fine dust goes everywhere. It is starting to look very nice. Once you get the excess glue from the joints it transforms into looking pretty cool. Some of my joints between strakes are really good, such that you can barely see the join. Others..well not so much, but it is what it is and I'm not going to worry about it. Plus I suspect the joins will become a bit less visible when I stain it. I have so far done about half the boat with 40 grit, and the other half at 60 grit, plan
I went stain shopping yesterday, came away with a couple of test pots. My plan is to get a couple of off cuts and then try staining and sealing with epoxy, and finally varnish to see what the final result should look like and also test compatibility between products.


I went stain shopping yesterday, came away with a couple of test pots. My plan is to get a couple of off cuts and then try staining and sealing with epoxy, and finally varnish to see what the final result should look like and also test compatibility between products.
Sanding is on-going, creates one heck of a mess. Thankfully the wife has thus far been putting up with it, but don't want to push that to far.
Also been working on finding the water line. I read a few accounts of how to do it. Some using lasers, some a clear tube with water and others a stick of a datum (usually the ground). So I read all about these various techniques and thought I would use the laser method as I happen to have a laser level and tripod left over from building a deck a few years. So consult the plans I located the waterline at the fore and aft end of the boat and marked these on the hull. I then set the laser up so that by swivelling it on the tripod I could land the laser dot on both of these marks. From there its a simple case of swivelling the laser and marking the hull at intervals. So I did all of this and it was pretty easy and went according to plan.
However after doing a dummy run at this I came away with a nagging doubt, and it took me a couple of days to figure out what it was. The Monaco has a setup level, which is the true bottom of the stringers (top of them while upside down). From this level the water line is located at a distance from this level at frame 0 and frame 8. However the distance at these two location is different, which means the water line is not level when the boat is on the building form. So I am thinking how can people be using a clear hose filled with water to find the level, unless of course the boat they are building does site on the building frame such that the water line is level, OR I am reading / doing something wrong. This is something I haven't resolved yet.
Saturday 3 May 2014
Hole is finished and sanding
Bored the prop hole out to 1.5" today. It was a fairly painless exercise.
Spent quite a bit of time sanding the sides. This is not going to be a quick task, but it is looking pretty sweet.
Also I have finally got hold of some decent tape to tidy up the wiring loom.
My fibreglass supplies also arrived on Friday
It seems like lots of things are moving forward at the moment.
One thing I hadn't thought of is stain so I need to investigate that quickly. I also need to decide if I am going to fibreglass the sides.
Thursday 1 May 2014
Drilling the prop shaft hole
Its Done !!
Was pretty easy. Had a couple of minor problems
1. The auger bit I am using has had a home made extension welded to it. The actual auger is only about 6 or 7 inches long. So once the hole gets deep the saw dust didn't get cleared out and instead backs up in the hole and compacts. So that caused the bit to get stuck a couple of times.
2. I didnt put a block on the inside so that the hole could fully form. I was able to back the drill out, screw on a block and then finished drilling the hole.
So I now have a 1" hole. Tomorrow I'll send a follower through to bore it out to 1.5"


Wednesday 30 April 2014
maths....more maths & drilling holes and gearboxes
So I read all the posts I could find about drilling the holes. It didn't look (& isn't) that complicated. Figuring out where and how to drill the holes is just another process.
First had to figure out where the rudder was going. I have settled on a RH prop and so that coupled with the helm being on the right side called for the rudder to be offset to the left. Couple of quick measurements showed that I need to put a block beside the keel to give a nice landing point for the rudder port. So I made an glued that block in.
Having now decided where the rudder was going to be, I can position the end of the prop shaft and you essentially work forward from there, prop nut, prop, strut. You have to leave enough gap between the end of the prop shaft and the rudder to allow the prop to be removed without dropping the rudder.
Then I set about doing the maths on where the hole for the prop shaft needed to be. This is calculated using a bit of simple trigonometry and Pythagoras theory. I found a nice description of the process written by Dave Lott. Followed his process more or less and came up with the entry point for the drill. Once the entry point is found I made a block to start the drilling process on. Because of the low angle (14 degrees) you need something to land the drill tip on otherwise it will just skip off. I'll post a photo to make that description make more sense.
The drilling is guided by using the strut. Where the strut needs to sit had to be flattened, to do this I made a template with plywood and then used the pattern attachment to my router and flatten it. Was pretty easy, just took a bit of time prepping.


All that done I discovered my drill bit is too short by about 250mm, so it gone to a machine shop to have 300mm added to it, overall length will then be about 1100mm.
 Tonight I drilled the rudder port hole. Did it with a standard hole saw. This is OK, except yo have to stop every 10mm or so and use a chisel to break the centre out. the whole (hole ?) process took about 10 minutes. Seems wrong to drill big holes in the bottom of your boat.
 Last weekend I also got some bolts for the gear box and bolted it up to the engine. Even though its the wrong gearbox it appears to be the same dimensions as the same as the correct gear box.
First had to figure out where the rudder was going. I have settled on a RH prop and so that coupled with the helm being on the right side called for the rudder to be offset to the left. Couple of quick measurements showed that I need to put a block beside the keel to give a nice landing point for the rudder port. So I made an glued that block in.
Having now decided where the rudder was going to be, I can position the end of the prop shaft and you essentially work forward from there, prop nut, prop, strut. You have to leave enough gap between the end of the prop shaft and the rudder to allow the prop to be removed without dropping the rudder.
Then I set about doing the maths on where the hole for the prop shaft needed to be. This is calculated using a bit of simple trigonometry and Pythagoras theory. I found a nice description of the process written by Dave Lott. Followed his process more or less and came up with the entry point for the drill. Once the entry point is found I made a block to start the drilling process on. Because of the low angle (14 degrees) you need something to land the drill tip on otherwise it will just skip off. I'll post a photo to make that description make more sense.
The drilling is guided by using the strut. Where the strut needs to sit had to be flattened, to do this I made a template with plywood and then used the pattern attachment to my router and flatten it. Was pretty easy, just took a bit of time prepping.
All that done I discovered my drill bit is too short by about 250mm, so it gone to a machine shop to have 300mm added to it, overall length will then be about 1100mm.
Tonight I drilled the rudder port hole. Did it with a standard hole saw. This is OK, except yo have to stop every 10mm or so and use a chisel to break the centre out. the whole (hole ?) process took about 10 minutes. Seems wrong to drill big holes in the bottom of your boat.Last weekend I also got some bolts for the gear box and bolted it up to the engine. Even though its the wrong gearbox it appears to be the same dimensions as the same as the correct gear box. Thursday 24 April 2014
Status Catch up
I've been super slack at keeping the blog updated. So here comes a marathon of updates. But first, I can never remember the URL for the blog and so always use goggle search. It is now the VERY 1st in the search list.
The Veneer layer has finally been completed, but not without the odd drama. My flash new band saw died again. By that point in time it had done less than 5 hours service. A quick check with the multimeter showed that it had an earth fault which explained why it tripped the Circuit breaker in the house every time I tried to run it. I strongly worded email (not rude or threatening) to the supplier gained a fairly instant response and within a couple of days they had come around to my house and replaced the motor.
The ECU for the engine hasn't arrived in Russia yet. Its now well over the expected transit time so I am starting to get nervous.
I decided it was time to see if the engine turned over. So I took out all the plugs and using a spanner wound it over by hand. It turned easily and water didn't come shooting out the spark plug holes thank fully. Next it was a trip to pick a part to get a few electrical bits to allow me to turn the engine over with the starter motor. This effort showed I had labelled a wire wrong, but other than that was very easy to achieve and the motor turned quite happily.
 Next phase for the engine is to get the loom back on. I have 9 broken plugs which are proving interesting to replace, the plugs are fine but for the broken locking tab but I can cable tie them on in the short term. I am also on the hunt for a suitable fuel pump, plenty available on eBay but they are mostly in-tank pumps. Once the fuel pump is sorted and the ECU comes back there is no reason I shouldn't be able to start it.
 This photo is of the test setup prior to shipping the ECU to Russia. Yury sent me instructions on a couple of simple test to confirm that the ECU is healthy.
So now that the veneer layer is finished I started to get into sanding. A trip to Bunnings for supplies, and then into it. Not five minutes into the sanding with my belt sander, the first belt separated at the join, after about 30 minutes all 4 belts I had bought did the same thing. So back to Bunnings to complain and get them replaced. Back home and 5 minutes in the first belt breaks again. While taking the belt off I noted that the drive roller was wobbly. Turned out it had stripped the thread used to secure it to the drive shaft. The belt sander was a Black & Decker Dragster, and although about 7 or 8 years old it hasn't done all that much service. Anyway it was beyond economical repair, so off to Bunnings I went again and to continue my theme of using Bosch Power tools I bought a Bosch Belt Sander. Its a bit of an odd looking thing, but it works really well, and catches the saw dust very well as well. I also haven't broken anymore belts so now I am things that the issue may have been with the belt sander rather than the belts.
So after about 4 or 5 hours of sanding with P60 the bottom is looking pretty good. At the bow where I used Mahogany the joins between planks range for beautifully invisible to pretty miserable. I am hoping they are a little more consistent on the sides. However I think once it is finished they wont look too bad.
So all of a sudden I am at the point of needing to drill the rudder and prop shaft hole. The rudder stuffing box, and its backing plate, and the prop strut have now arrived (and look seriously cool). I new that the drilling was coming up, I even borrows some suitable drill bits and a big old and nice and slow electric drill to do it, but I have to admit to still being surprised to all of a sudden being at this point.
I had planned to have done all the research and planning for the drilling in prep for reaching this point but have only got things I have read in the past to work from at the moment. So I have now embarked on a planning session to prepare for drilling. The actual drilling of the holes doesn't worry me too much, I know its just a process of planning and prep. So I've begun researching starting with articles / posts on the glen - l site / forum. I also have Glen Witts in-board installation book. I have read this book in the past and found it to be seriously dated but with what seem like good nuggets of information sprinkled in it.
Speaking of out dated I also got "How to Fibreglass boats - 2nd ED", this book too is seriously dated. They could easily rip out all the stuff on Polyester. The author also waffles a lot, the book could be made about 1/2 the size if he got to the point and didn't repeat himself three times over. However like the inboard engine book there are nuggets of useful info throughout the book. However, I also bought the DVD, and this was much more useful and to the point. I would recommend people by this and skip the book. It too talks a bit about polyester but everything else is pretty relevant / useful / helpful.
I still have a lot of sanding to do, but I am now looking at fibreglassing the bottom within the next month or so depending on what fibreglass cloth costs.


The Veneer layer has finally been completed, but not without the odd drama. My flash new band saw died again. By that point in time it had done less than 5 hours service. A quick check with the multimeter showed that it had an earth fault which explained why it tripped the Circuit breaker in the house every time I tried to run it. I strongly worded email (not rude or threatening) to the supplier gained a fairly instant response and within a couple of days they had come around to my house and replaced the motor.
The ECU for the engine hasn't arrived in Russia yet. Its now well over the expected transit time so I am starting to get nervous.
I decided it was time to see if the engine turned over. So I took out all the plugs and using a spanner wound it over by hand. It turned easily and water didn't come shooting out the spark plug holes thank fully. Next it was a trip to pick a part to get a few electrical bits to allow me to turn the engine over with the starter motor. This effort showed I had labelled a wire wrong, but other than that was very easy to achieve and the motor turned quite happily.
Next phase for the engine is to get the loom back on. I have 9 broken plugs which are proving interesting to replace, the plugs are fine but for the broken locking tab but I can cable tie them on in the short term. I am also on the hunt for a suitable fuel pump, plenty available on eBay but they are mostly in-tank pumps. Once the fuel pump is sorted and the ECU comes back there is no reason I shouldn't be able to start it.This photo is of the test setup prior to shipping the ECU to Russia. Yury sent me instructions on a couple of simple test to confirm that the ECU is healthy.So now that the veneer layer is finished I started to get into sanding. A trip to Bunnings for supplies, and then into it. Not five minutes into the sanding with my belt sander, the first belt separated at the join, after about 30 minutes all 4 belts I had bought did the same thing. So back to Bunnings to complain and get them replaced. Back home and 5 minutes in the first belt breaks again. While taking the belt off I noted that the drive roller was wobbly. Turned out it had stripped the thread used to secure it to the drive shaft. The belt sander was a Black & Decker Dragster, and although about 7 or 8 years old it hasn't done all that much service. Anyway it was beyond economical repair, so off to Bunnings I went again and to continue my theme of using Bosch Power tools I bought a Bosch Belt Sander. Its a bit of an odd looking thing, but it works really well, and catches the saw dust very well as well. I also haven't broken anymore belts so now I am things that the issue may have been with the belt sander rather than the belts.
So after about 4 or 5 hours of sanding with P60 the bottom is looking pretty good. At the bow where I used Mahogany the joins between planks range for beautifully invisible to pretty miserable. I am hoping they are a little more consistent on the sides. However I think once it is finished they wont look too bad.
So all of a sudden I am at the point of needing to drill the rudder and prop shaft hole. The rudder stuffing box, and its backing plate, and the prop strut have now arrived (and look seriously cool). I new that the drilling was coming up, I even borrows some suitable drill bits and a big old and nice and slow electric drill to do it, but I have to admit to still being surprised to all of a sudden being at this point.
I had planned to have done all the research and planning for the drilling in prep for reaching this point but have only got things I have read in the past to work from at the moment. So I have now embarked on a planning session to prepare for drilling. The actual drilling of the holes doesn't worry me too much, I know its just a process of planning and prep. So I've begun researching starting with articles / posts on the glen - l site / forum. I also have Glen Witts in-board installation book. I have read this book in the past and found it to be seriously dated but with what seem like good nuggets of information sprinkled in it.
Speaking of out dated I also got "How to Fibreglass boats - 2nd ED", this book too is seriously dated. They could easily rip out all the stuff on Polyester. The author also waffles a lot, the book could be made about 1/2 the size if he got to the point and didn't repeat himself three times over. However like the inboard engine book there are nuggets of useful info throughout the book. However, I also bought the DVD, and this was much more useful and to the point. I would recommend people by this and skip the book. It too talks a bit about polyester but everything else is pretty relevant / useful / helpful.
I still have a lot of sanding to do, but I am now looking at fibreglassing the bottom within the next month or so depending on what fibreglass cloth costs.
Sunday 6 April 2014
Veneer layer nearly finished
So as of right now I have one strake to go on the veneer layer. It seems to have taken an age, but funnily the end of it has raced up. So by next week it will be done.
I have ordered some parts from Glen L, the strut, the rudder stuffing box and the box on how to fibreglass the hull.
The latest plan is to turn the boat over before the end of the year, big jobs in the ways are
1. Sanding the veneer layer.
2. Drill the holes for prop and rudder
3. Fibreglassing the bottom
4. Painting the bottom
5. Varnishing the sides
As mentioned I have ordered the book on how to do the fibre glassing, as yet I have done no research on paint or varnish to see what is available here in NZ.
Engine changes
So my last post ended a bit dispondent about the issues with trying to use a VVTI lexus engine. However I think I have overcome all the problems. I have been exchangeing emails with a guy called Yury in Russia. He has been very help. He sent me instructions for testing that the ecu is basically healthy which it was. So now the ECU is on its way to Russia to have the security bypassed.
I have also found out what the mysterious oil hoses and soleniod are. They are from a hydrulic pump tht is used to power the radiator fan. No radiator on a boat, so this pump assembly has been stripped down and only the body remains now. The body has to stay as it forms part of the cam belt covers. I mentioned in the previous post that i though this pump was actually the water pump, but no, that's buried under the cam covers as it is driven by the cam belt.
I have identified the last of the wiring, at this stage I only have to match a few wires up and i'll be good to go. Once the ECU comes back I'll make up a basic panel to mount the ECU, fuses and relays on for testing. I cant make the final version of this panel until I see how things sit in the boat.
It takes 6-10 working days for the ECU to get to Russia, Yury said he would turn it around in three days and then I am guessing it will be a couple of weeks coming back. So I expect it back early May.
I am looking at jury rigging up a fuel pump and then I should be able to start it. So that my target for end of june, to get it running, it will have no alternator, no cooling system, no exhaust system, no fly wheel, but as long as it runs for 30 seconds I will ne happy
Sunday 23 March 2014
Engine investigations
So I have run out of wood and didn't get back from out of town on Friday in time to get some more.
So I decided to tinker with the engine some more.
Quite some time ago I took the wiring loom off in order to strip out the un-required auto trans wiring and to start figuring out some of the wiring coming out of the ecu.
I have been tossing up whether to use the stock ecu or get an aftermarket one (link / megasquirt / haltech etc). The issue with the stock computer is the security function as I do not have the ecu or transponder parts. I had previously looked into having the security bypassed but it seemed expensive when compared to the after market ecu's.
However today I have come to the conclusion that due to the electronic throttle I have to use the stock computer otherwise it means replacing the throttle body as well. The throttle is a combination manual / electronic. It has a cable going to the throttle body. This has a position sensor on it that the computer then uses to drive a motor on the actual throttle.
I also figured out what most of the other sensors and wires on the actual engine are. Still got a lot of wires on the ecu to sort out.
Of the options for bypassing, cheapest and easiest seems to be a place in Russia. Sent them an email tonight to see what they say
Identified most of the piping as well. There is an oil line I can't figure out. Seems to have a soleniod. What is stranger is it seems to be pressurized by the water pump.
I have come to the conclusion that the problems using a vvti engine are greater than those it fixed. But what's done is done and I will make it work.
Sunday 23 February 2014
Veenering back underway
I have finally got over all my bandsaw issues and things are proceeding nicely now. The last big improvement was purchasing a decent blade. I went for a 3TPI and 20mm wide. This extra width greatly helps with keeping the blade on course. Down side isit is slightly thicker.
I am still losing nearly 50% to the re-saw and thicknessing activities.
I am hoping to complete the veneering by the end of March.
From there I need to get the strut, rudder, rudder shaft log and prop shaft in order to determine the locations for these irems and drill the holes. This has to be done before I fiberglass the bottom.
Saturday 1 February 2014
Vennering status
Christmas was supposed to be the opportunity to make great leaps if progress. As it turned out I made very little. Bandsaw dramas were one of the leading causes, the other was I ran out of glue and the place that sells it was closed over the Christmas break.
So currently the bottom is complete and has had a skim sand to get the worst of the plastic nail heads and glue off.
The sides have progressed by one piece of stake. Hopefullty with the new blade I will be away again.
This time last year I made myself a schedule. I am now a good four months behind, I have also looked at the costs of the next stage, which means it will practically take me until next Christmas at best to get to where I had planned to get to by the Christmas just gone.
Setting up a bandsaw
One of the most difficult tasks on a bandsaw is actually making it cut straight. If your freehanding a cut then here is no problem; but as soon as you want to cut against a fence then it will all go pear shaped if you haven't got it aligned correctly.
I did a lot of research on this when I got my first bandsaw. I found lots of articles which describe this method; a breif version is:
1. Take a piece of something flat that is at least a couple of inches wide and 12 inches long. Down one side scribe a line about an inch from the edge.
2. Free hand cut along this line until you are about 1/2 way along the line then stop the saw being careful not to move the work piece.
3. Adjust the fence to align against the edge of the wood.
Now I have two bandsaws and neither of them feature any sort of adjustment for this purpose. They do now as I have modified them to provide for it.
What I have since discovered is that the above is certainly a necessary step but the first step is to get the blade tracking on the wheels correctly. By moving the blade back and forth over the crown of the wheels the angle it cuts at changes quite dramatically. Then small adjustment can be achieved by using spacers to shift the mounting of the fence.
Friday 31 January 2014
Bandsaw nightmares
After struggling to get my old bandsaw to behave, my wife took pity on me and bought me a new one. After quite a bit of internet research we settled on a model 14" model supplied by a local machinery importer. The model itself is supposedly a German design but manufactured under licence un China. All in all it is reasonably well made but I quickly came across a large problem.
After cutting my first lamination and it not going so well I found that the rear guide was out of adjustment. No matter what I tried I couldn't get it into the right place. To be fair the supplier was helpful and even tried sending replacement parts. In the end it went back for them to try and fix. The issue was there was insufficent adjustment in the lateral adjustment of the guide head. The adjustment is achieved by rotating and eccentric shaft. I suggested to them the easiest fix would be to make a new shaft.
So a week went by and they rang me to say it was all fixed. I went along to pick it up and they feed me this bullshit story about how they adjusted this and that and it looked ok.
Got it home and went through the setup process again and found that all they had done was push the blade across with the guide, and worse they hadn't done up any of the locking nuts for the various adjustments they had messed with. Pretty pissed with them to be honest as not only had they not fixed it, they had messed up the rest of the setup.
So I set about setting it all up properly and after fixing everything else it still didnt line up properly. So I set off to see one of my old customers that has an extensive machine shop and he made me a new eccentric shaft which almost solved the problem. The second issue with the adjustment was the hole the shaft went into on the guide support post was pretty sloppy. Sorted that out and now the guide is in the right place.
Still took a lot of effort to try and get it cuttig straight and square. I think I am basically there but the blade that came with the machine is crap so I am waiting for a new blade.
Subscribe to:
Posts (Atom)